Required Components and Tools
| Item | Manufacturer | Cost (£) |
| Digital Light Projector, DLPDLCR2000EVM | Texas Instruments | 109 |
| Condenser Lens, 50mm Diameter PCX | Edmund Optics | 36 |
| Tube Lens, 9X Eyepiece Cell Assembly | Edmund Optics | 63 |
| Objective Lens, 10X Semi-Plan Standard | Edmund Optics | 121 |
| Glass Diffuser, DG10-1500 | Thor Labs | 15 |
| Camera Lens, 25mm Uncoated Gorilla Glass Window | Edmund Optics | 28 |
| Camera Seal, O-ring 23.5mm Bore, 25.5mm Outer Diameter | RS Components | 1 |
| Longpass Dichroic Mirror (GFP Imaging), 490nm | Thor Labs | 205 |
| Bandpass Filter (GFP Imaging), 520nm | Thor Labs | 141 |
| Raspberry Pi 4 Board, 4GB | The Pi Hut | 54 |
| Power Supply, RS Pro Plug-In Power Supply 5V | The Pi Hut | 11 |
| Raspberry Pi Camera, v2 | The Pi Hut | 24 |
| Raspberry Pi Camera, HQ | The Pi Hut | 50 |
| Camera Connector, Flex Cable for Raspberry Pi Camera 300mm | The Pi Hut | 2 |
| 2 X SD Cards, SanDisk Ultra 16GB and 32GB microSDHC | Amazon | 13 |
| Interface PCB, Pi Zero W adaptor board to Projector | Tindie | 3 |
| Power Supply, Raspberry Pi 4 Power Supply | The Pi Hut | 8 |
| Power Supply, RS Pro Plug In Power Supply 5V | RS Components | 12 |
| Cooling Fan, 52Pi Extreme Cooling Fan Kit for Raspberry Pi | RS Components | 14 |
| Stepping Motor, 28BYJ-48 5V DC Small Reduction Stepper Motor | The Pi Hut | 5 |
| Stepping Motor Driver, ULN2003 | The Pi Hut | 2 |
| Brightfield LED, 3.7V White 829-4275 | RS Components | 1 |
| Green Fluorescence LED, 485nm 3W XPEBBL-L1-0000-00301 | RS Components | 1 |
| 405nm LED, CUN06B1B | RS Components | 14 |
| PLA Filament, 1.75mm 1Kg Reel | FilaPrint | 28 |
| ABS Filament, 2.85mm 750g Reel | Fillamentum | 19 |
| Linear Rail Set, Glvanc 3D Printer Guide Rail Sets | Amazon | 28 |
| X-Y Stage, Zetiling Microscope Moveable Stage | Amazon | 22 |
| Linear Motion Ball Bearing, LM8LUU | Amazon | 7 |
3D Printed Components
| File Name | Use |
| DMPRT_camera_mount | Mount for Pi V2 camera |
| DMPRT_clamp_screw | Screw to hold the condenser lens to the projector mount. |
| DMPRT_filter_cube | Part in between the camera mount and the objective/eyepiece lens holder. The filter can be slotted into this cube. |
| DMPRT_lid | Lid attaches to the upper body. |
| DMPRT_lower_body | The lower body connects to all mechanical metal rods and the camera mount. |
| DMPRT_neutral_density_clip DMPRT_ground_glass_clip | A clip to hold a neutral density filter above the condenser lens. In later versions, it holds a ground glass diffuser. |
| DMPRT_objective_lens | A tube to hold the objective and tube lens. |
| DMPRT_Pi_case_bottom | Attachment to hold the Pi 4 to the lower body. |
| DMPRT_Pi_case_top | Hold the Pi4 in place and attaches to the Pi_case_bottom |
| DMPRT_projector_lid | Encloses the projector module and holds a through-hole LED for brightfield illumination in version 2. |
| DMPRT_projector_mount | Holds the projector module and the mount attaches to the upper body |
| DMPRT_stage | Connects the upper and lower body together. Samples are placed on this stage. |
| DMPRT_tube_lens | Holder for the tube lens |
| DMPRT_upper_body | Connects to the stage and holds the projector module in place. |
| New Functions for DOME2.0 | |
| DMPRT_filter_block | Update to the filter cube, to allow for integration with the HQ camera and easier filter insertion. |
| DMPRT_HQcamera_mount | Mount for the Pi HQ camera |
| DMPRT_DLP_LED_casing | Hold the native LEDs away from the projector lens |
| DMPRT_DLP_fitting | Mount to hold the custom PCB with LED next to the projector lens |
| DMPTR_motor_holder_top | Enclosure around the stepper motor attached to the led screw. |
| DMPRT_motor_holder_bottom | Attachment between the motor holder top and the lower body of the DOME. |
| DMPRT_dichroic_mirror_arm | Attached to the mirror base and holder |
| DMPRT_dichroic_mirror_base | Attaches the mirror arm to the stage. |
| DMPRT_dichroic_mirror_holder | Holds the dichroic mirror in place for GFP imaging. |
| DMPRT_stage_for_heating_pad | Updated stage for heating pad installation |
Tools
- 3D printer
- Soldering iron
- Allen keys
- Spanners 5mm, 5.5mm and 6mm
- Filers to adjust 3D printed parts
- Pliers to adjust 3D printed parts
Other materials:
- Soldering tin
- M3 bolts and nuts, various lengths
- M2.5 bolts and nuts, various lengths
- M2.5 and M3 brass inserts
- Two series of 2×23 female pins to solder on the custom PCB
- One male-female jumper for the projector board
- Resistors for the LEDs, calculate based on your power supply
Desktop Set Up
- Monitor with HDMI input
- Keyboard with USB cable
- Mouse with USB cable
- Micro HDMI to HDMI cable (or adapter) to connect Raspberry 4 to a monitor
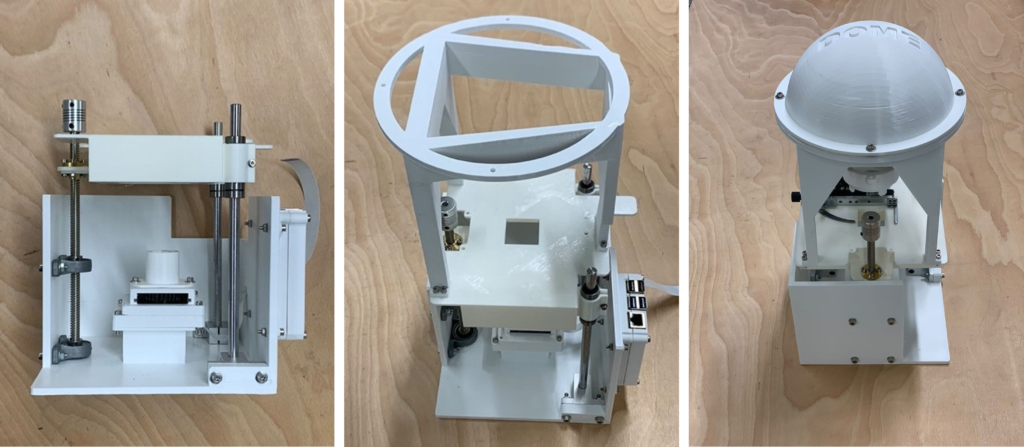
Assembly
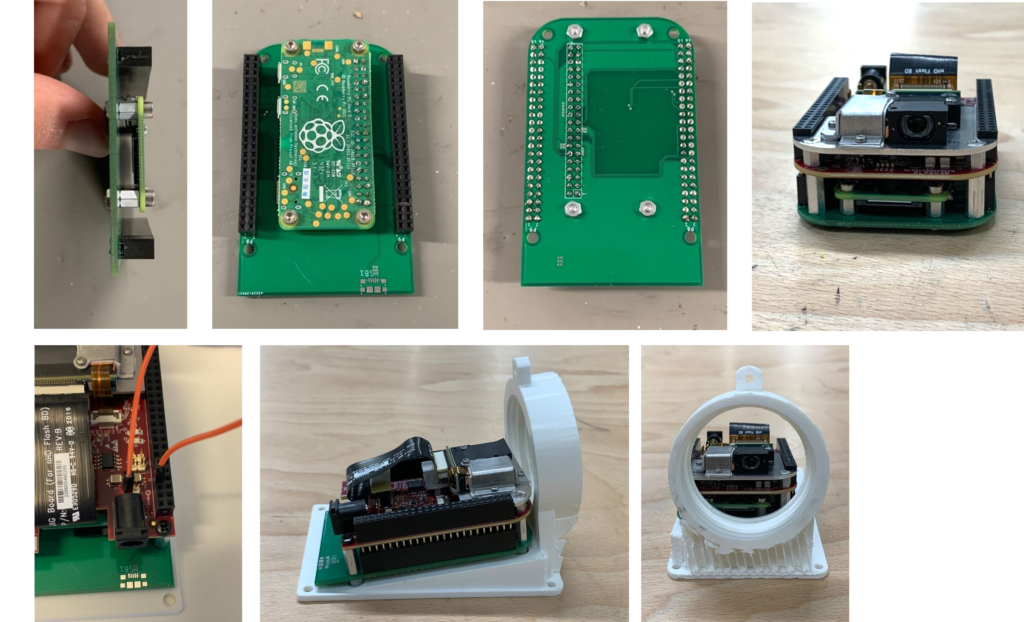
- Prepare the Projection Module
- Solder the female pins to the interface PCB.
- Attach the Pi0 board to the interface PCB using small distancers (approx _cm)
- Solder the Pi0 to the interface PCB
- Connect the projector to the interface PCB.
- Connect the male-female jumper as shown in the image (this allows the Pi0 to be powered by the projector)
- Attach the projector module to the DMPRT_projector_mount
- Insert the condenser lens into the DMPRT_projector_mount and fix into place with the DMPRT_clamp_screw
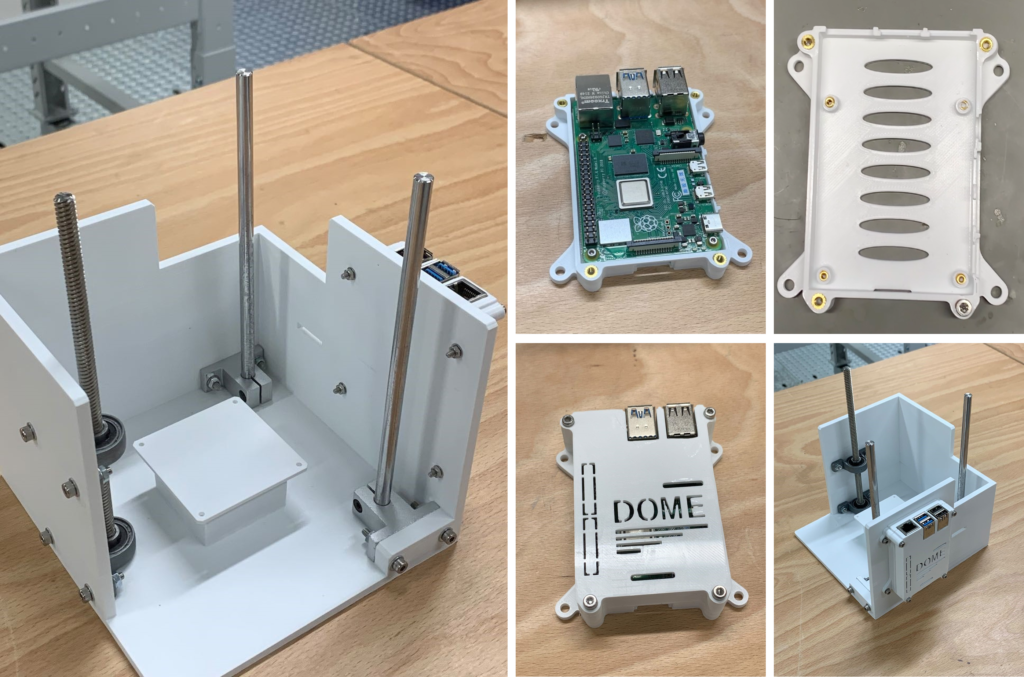
2. Assemble the Lower Body
- Assemble the supports for the lead screw and the linear guide rails to the DMPRT_lower_body
- Insert the lead screw and the linear guide rails into the supports
- Insert M3 (four outer holes) and M2.5 (four inner holes) metal inserts on the DMPRT_Pi_case_bottom
- Attach the Pi4 to the DMPRT_Pi_case_bottom
- Close the Pi case by attaching the DMPRT_Pi_case_top
- Attach the DMPRT_Pi_case_bottom to the DMPRT_lower_body
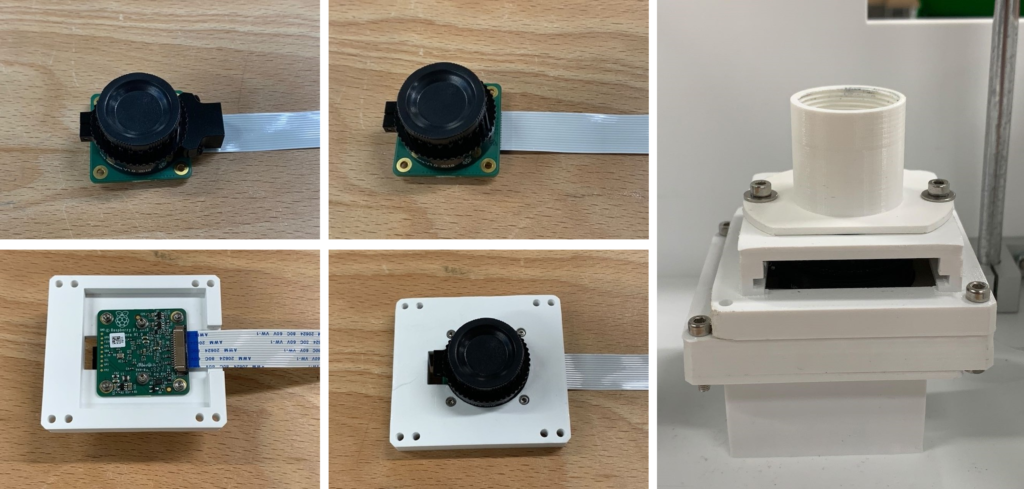
3. Assemble the Imaging Module
- For the Pi Camera HQ detach the metal support
- Unscrew the C-CS lens adaptor on the HQ camera and place the camera lens and seal on top of the sensor, then screw the lens adaptor back into place (this will create a seal and protect the camera sensor)
- For the Pi Camera V2, no adaptation is required
- Replace the stock camera cable with the longer 300mm cable
- Attach the camera to either DMPRT_HQcamera_mount or DMPRT_camera_mount
- Attach the DMPRT_HQcamera_mount to the DMPRT_lower_body
- Attach the DMPRT_filter_block (you can also use the DMPRT_filter_cube) to the DMPRT_HQcamera_mount
- Insert the tube lens into the bottom of either DMPRT_tube_lens or DMPRT_objective_lens depending on the height of the imaging column needed and attach the eyepiece to the top
- Attach the DMPRT_tube_lens or DMPRT_objective_lens to the DMPRT_filter_block
- Connect the camera cable to the Pi4 through a hole on the side of the DMPRT_lower_body
4. Assemble the Upper Body
- Attach 2 linear bearings and the brass nut to the DMPRT_stage
- Attach the calliper to the DMPRT_stage
- Attach the projection module together with the DMPRT_projector_lid to the DMPRT_upper_body
- Attach the DMPRT_upper_body to the DMPRT_stage
5. Assemble All Parts Together
- Insert the DMPRT_stage on the linear rails.
- Attach the lead screw coupler to the lead screw
- Attach the DMPRT_lid to the DMPRT_upper_body